I wanted a rowing boat in the style that I remember from my childhood in England and eventually decided to build one myself. After a lot of reading and web searching I chose an Iain Oughtred design, the Acorn 15. For a description of the Acorn 15 click here.

If you would like to contact me please Click to Send me Email


Sunday 7 February 2021

Gone to a New Home.

Sadly I have parted with my Acorn 15 but am very pleased  because I know the new owner will take care of her and use er a lot. Probably a lot more than I have done in the last two or three years. Too many projects and other boats to use!

Here she is, off to her new home.


And on the water with the new owner.


Friday 16 December 2011

It Floats!

There wasn't really any doubt in my mind about it floating and not leaking but it was good to see it float away from the trailer to the limit of its painter before I pulled it back in. First time out I rowed too far and ended up with some very sore muscles (but not where I expected to be sore). The next couple of outings I didn't overdo it and am gradually improving the hardware involved in rowing. A footrest (to brace the feet/legs against) appears to be important. The balance of the oars is important (there is now 800 grams of lead sheet wrapped around the inboard end of the oar).  Last on the list of improvements is my technique which is gradually improving (it's important to rest between strokes).

Third time out I managed to arrange a camera person and have some pics:


And, finally, a short video:


Sunday 4 December 2011

Days 44 to 62 - The End Result

It is about a month since the last entry in the blog. The inside of the hull has 10 coats of varnish, The outside has 3 coats of paint. The oars are finished. The trailer is built. The boat is ready to go for its first sail. Here are a few pictures of the end result.


Saturday 5 November 2011

Days 40 to 43 - The Last Stages

Over the past few days the forward thwart knees and the rest of the spacer blocks have been fitted. The inner gunwale could then be shaped, scarf joints at both ends made it a tricky job with lots of trial and trimming, and glued in place. The backrest for the stern seat was laminated from 3 pieces of 4 mm ply over a curved former and, after the epoxy set, shaped to fit.

The photos below show the boat as it is today. The next jobs are to do a lot of sanding followed by varnishing and painting it inside and out respectively. This will take a while!


Tuesday 25 October 2011

Day 39 - Spacer Blocks for Gunwales

After a long break I have finally returned to boat building. Since the last post one of the laminated knees for the forward thwart started to delaminate. This is a bit of a mystery and I can only guess that the problem was caused by glueing it while there was too much moisture in the timber (I had to soak them to achieve the required bend). I glued up another knee today.

I also glued the centre thwart in place. The parts were all shaped and ready to go so this was a quick job.

I glued about 3/4 of the spacer blocks for the inner gunwale. This is a tedious job because there are a lot of them, about 40 of them on each side of the boat. The spacers are 55 mm long with a nominal 75 mm gap between them. Marking out their positions involed several iterations to get them spaced evenly taking into account the position of the thwart knees.

Today's pics show the spacer blocks towards the stem and aft of the centre thwart (still with their clamps in place).


Tuesday 6 September 2011

Day 38 - A Status Report

The floors are all glued in place. So are the thwart cleats and the breasthook. Here are a couple of photos showing the state of the boat today.


The thwarts and floor boards are just resting in place. Since the photo was taken the forward thwart, its riser and the mast step have been glued in place.


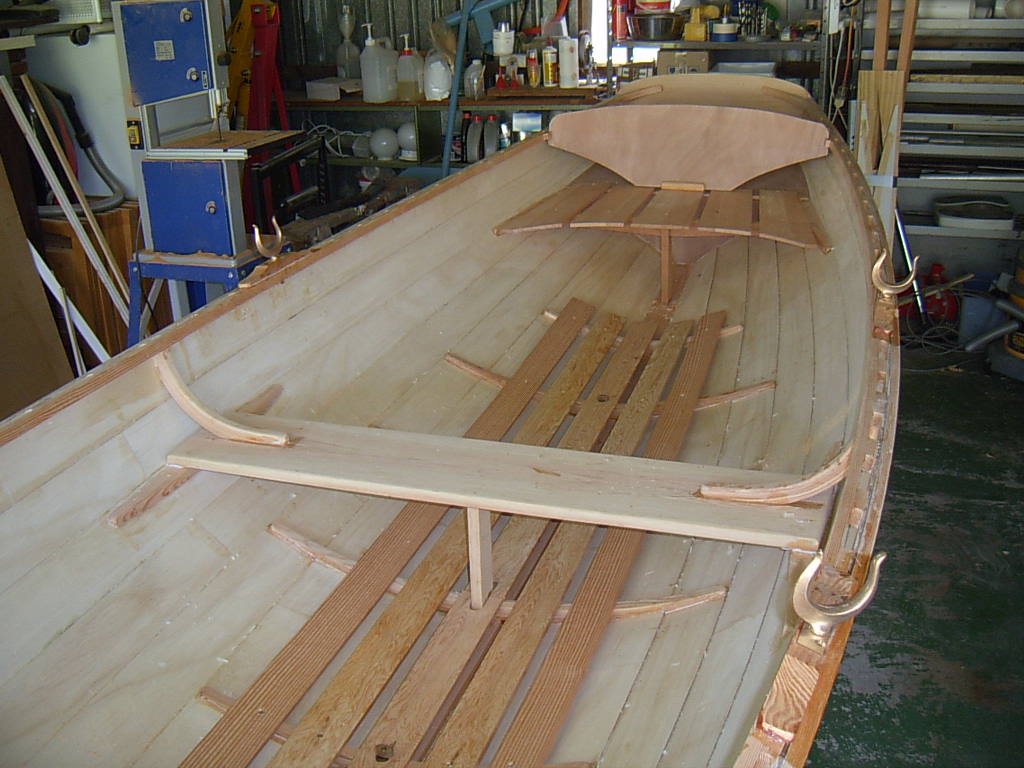
Same situation but looking towards the stern. The sternsheets are only resting in place.

The only parts that still need to be shaped are the thwart knees. These were laminated some time ago so should not take long to finish. Jobs still to do are:
1. Glue both thwarts in place.
2. Shape the thwart knees and fix in place.
3. Gunwales (big job!).
4. Finish sternsheets and screw in place.
5. Stern seat back, laminate ply and shape to suit boat.
6. Floorboards, finish and screw in place.
7. Other, something must have been forgotten!.


Saturday 3 September 2011

Day 36 and 37 Forward Buoyancy Compartment and Floors

Making and fitting the floors to the inside of the hull seems to have been going on for days but they are now all ready to be glued in. Before doing that the hull has been scraped and sanded inside to remove the last of the epoxy squeezed out from the plank laps. The frame for the forward buoyancy compartment is complete and the vertical face has its ply panel glued on. This photo shows the buoyancy compartment, it is a bit hard to see behind the clutter!


The first 2 floors from the bow have been glued. I have put masking tape along the glue lines (it is hard to see because it is just about the same colour as the wood) in the hope that it will make the clean up easier. The gaffer tape across the ends of the floors is to stop them sliding about. The vertical white strips are "sky clamps" to hold the floors down against the hull until the epoxy goes off.